CentOS Network Installation
The Department's CentOS installation is an automatic Linux installation that will install an official CentOS OS supported by the department. Once the automatic installation is done it will have the latest updates.
- What do I need to install CentOS on my research machine?
- I have my account now, what do I do next?
- Netinstall does not match your installation?
- The kickstart cannot be loaded?
- Cannot mount directory?
CentOS Installation Troubleshooting
What do I need to install CentOS on my research machine?
You must request a Linux installation account to sysman@utep.edu. Your Linux account can be share amoung your research team and faculty members.
I have my account now, what do I do next?
Once you get your share Linux account, you must SSH to the configuration server. This is done by
using a Windows/Linux ssh client. If you do not have SSH client or your Windows machine download from
here.
# ssh linux_username@setup.cs.utep.edu
Installation Procedure
- # ssh linux_username@setup.cs.utep.edu
- # cd /kickstart
Below you will a snap shoot of the directory instructor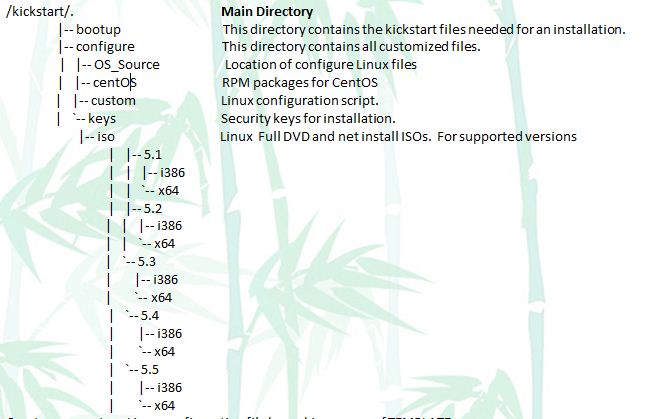
- Create or Edit your custom Linux kickstart configuration file.
- #cd bootup
- #cp TEMPLATE my_host.cfg
- #chmod 755 my_host.cfg
- Check for valid CentOS installation images.
# df -k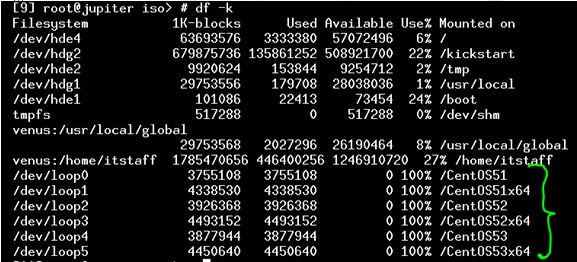
- Networking Information Chemistry & Computer Science Building
- IP Address: 129.108.18. or 129.108.19. Must request to static IP sysman@utep.edu
- Subnet: 255.255.254.0
- Gateway: 129.108.18.1
- IP Address: 129.108.4. Must request to static IP sysman@utep.edu
- Subnet: 255.255.255.0
- Gateway: 129.108.4.1
- IP Address: 129.108.20.[101-131] Must request to static IP leonardo@utep.edu
- Subnet: 255.255.255.0
- Gateway: 129.108.20.1
- IP Address: 129.108.156. Must request to static IP helpdesk@utep.edu
- Subnet: 255.255.255.0
- Gateway: 129.108.156.1
- IP Address: 10.10.10.
- Subnet: 255.255.255.0
- Gateway: 10.10.10.14
- Edit your kickstart file my_host.cfg.
#
#
# Search for xxx and replace the AAA with IP of the machine
# Search for xxx and replace the BBB with netmask for your building
# Search for xxx and replace the CCC gateway of your building
# Search for yyy and replace the DDD with name of the machine
# Search for eth0 and replace it with either em1 or p2p1
#
#
:
DO NOT EDIT ANYTHING BETWEEN THESE LINES
:
DO NOT EDIT ANYTHING BETWEEN THESE LINES
nfs --server=setup.cs.utep.edu --dir=/CentOSXX <REPLACE CENTOSXX WITH A VALID CentOS INSTALLATION image, see step 4>
:
DO NOT EDIT ANYTHING BETWEEN THESE LINES
:
# Network information
network --bootproto=static --device=em1 or p2p1 --ip=129.108.AAA.AAA. --netmask=255.255.BBB.0 --gateway=129.108.CCC.1 --nameserver=129.108.156.13,129.108.156.14
--hostname=DDD.cs.utep.edu --onboot=on
:
DO NOT EDIT ANYTHING BETWEEN THESE LINES
:
DO NOT EDIT ANYTHING BETWEEN THESE LINES
:
%post
#Point yum updater to CS repo
%packages
LINUX STANDARD DEVELOPMENT SOFTWARE - MODIFY AS NEEDED
- Save your modified kicktstart configuration file.
- To install Linux over the network you will need to download the netinstall ISO located at /kickstart/iso/x.x
NOTE: Your netinstall CD must match your CentOS installation image - Download CentOS-x.x-386-netinstall.iso for a 32 bit installation
- Download CentOS-x.x-86_64-netinstall.iso for a 64 bit installation
- Use any software that can burn an iso file to a CD. The netinstall is only about 9MB. For instructions on how to burn an ISO click here.
- Steps to start the Linux Kickstart installation:
- Load CentOS kickstart CD on the PC.
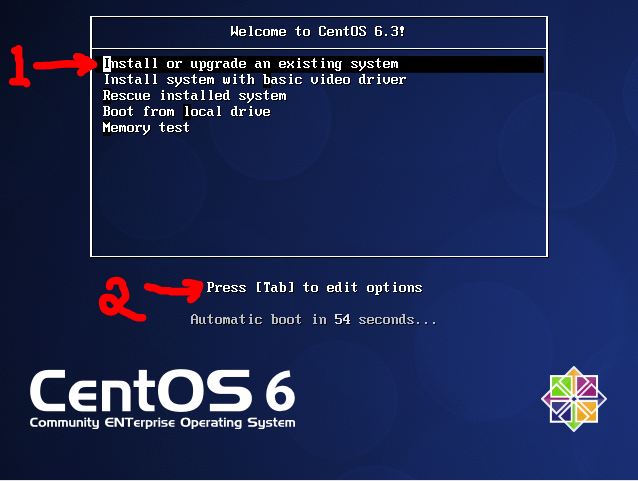
- At bootup, make sure that Install or upgrade an existing system is highlighted and then press tab before the automatic boot clock runs out.
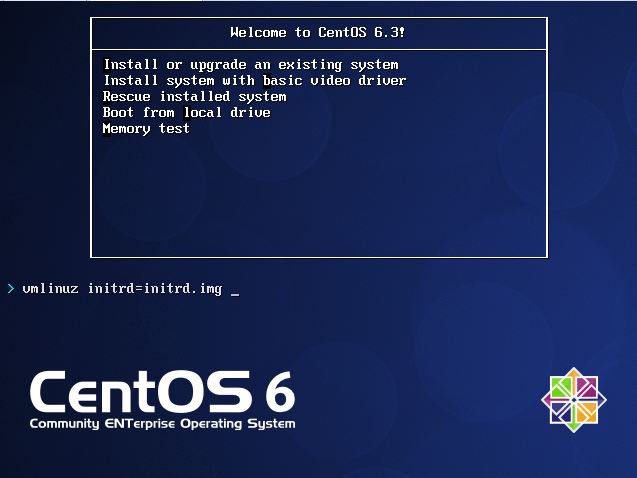
- On the next screen, append one of the following lines from the choices below onto the command line given:
- linux ks=nfs:setup2.cs.utep.edu:/kickstart/bootup/my_linux.cfg
- Press ENTER
- linux ks=nfs:setup2.cs.utep.edu:/kickstart/bootup/my_linux.cfg ksdevice=em1 ip=my_linux_IPAddress netmask=my_building_netmask gateway=my_building_gateway dns=129.108.156.13
- Press ENTER
- linux ks=nfs:10.10.10.1:/kickstart/configure/bootup/my_linux.cfg ksdevice=em1 ip=my_linux_IPAddress netmask=255.255.255.0 gateway=10.10.10.14 dns=10.10.10.11
- Press ENTER
- The installation will start automatically without user intervention and it will take about 1-3 hours to complete.
Normal kickstart installation.
- Once the CentOS is finished being installed and update the machine will reboot automatically
If DHCP is available:
Finalize Linux Installation
- From a Windows use the SSH client to log into setup.cs.utep.edu and finalize the setup of the new CentOS installation!
- # cd /kickstart/configure/custom
- # ./initial_conf Press ENTER
- Make sure you have the static IP of the machine handy, as you will need it.
- Once you make all the selections, you will be prompted to enter the root password three times. This is because it needs
to copy the ssh folder, the ssk-key, and setup the ssh folder permissions.
Note:
This step is very critical, if you skip this step you will need to type the root password several times during the Linux configuration.
If the machine is going to be joined for the first time to the cs.utep.edu domain, please inform sysman@utep.edu before running next script.
- The machine X-Server from the configure CentOS machine will be restarted and a different wallpaper will come up after the script
is completed. See below

- # ./linux_configure Press ENTER
- Make sure you have the static IP of the machine handy, as you will need it.
- Once the script is completed, it will reboot the machine.
- The machine will accessible by SSH by everyone.
- The root account will be denied access from SSH.
- The machine will either be part of the cs.utep.edu domain or stand alone.
- A stronger Linux password will be required.
- The machine will download and install the all critial updates from CentOS.
- Sudo access will be given to domain machines as root is restricted to Domain Admins.
After the reboot
Netinstall does not match your installation?
Open your my_hosts.cfg and look for this line
nfs --server=setup.cs.utep.edu --dir=/CentOSXX
Check that you are using the right netinstall where XX is the CentOS X.X, version for the image that you are installing.
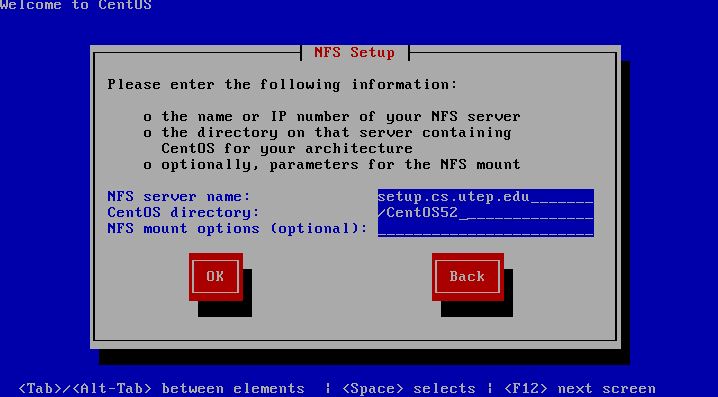
The kickstart cannot be loaded?
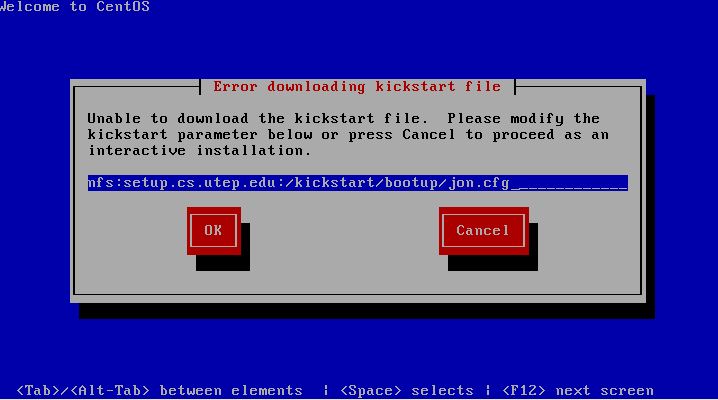
Make sure that you my_hosts.cfg has permission 755.
if you misspell the kickstart filename just retype the name and click OK
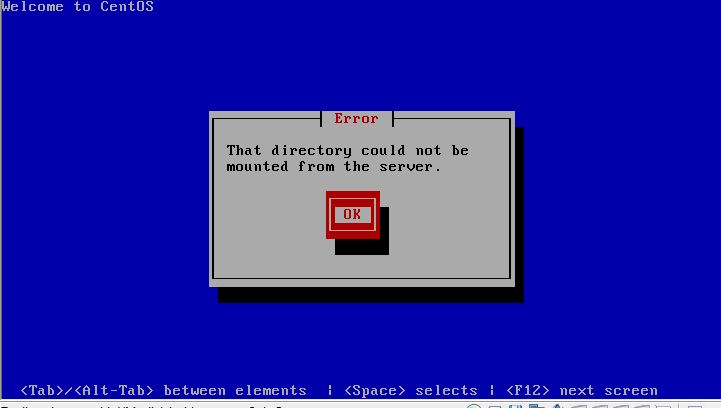
This error is due to a misspell CentOS installation image or the image is not being shared.
- Click on the OK button
- The NFS setup screen will appear after a while, here you will have the chance to type the right CentOS directory
- Double check what CentOS image is available, click here
- Then click OK to continue.
- If the machine is able to mount the directory you will the next screen.
- If the machine is unable to load the directory the CentOS image folder may not be shared. In this case report the problem to sysman@utep.edu